Run Vantage Express on Azure
Author: Adam Tworkiewicz
Last updated: August 23rd, 2022
Overview
This how-to demonstrates how to run Vantage Express in Microsoft Azure. Vantage Express contains a fully functional Teradata SQL Engine.
| If do not wish to pay for cloud usage you can install Vantage Express locally using VMware, VirtualBox, or UTM. |
Prerequisites
-
An Azure account. You can create one here: https://azure.microsoft.com/en-us/free/
-
azcommand line utility installed on your machine. You can find installation instructions here: https://docs.microsoft.com/en-us/cli/azure/install-azure-cli.
Installation
-
Setup the default region to the closest region to you (to list locations run
az account list-locations -o table):az config set defaults.location=<location> -
Create a new resource group called
tdve-resource-groupand add it to defaults:az group create -n tdve-resource-group az config set defaults.group=tdve-resource-group -
To create a VM you will need an ssh key pair. If you don’t have it already, create one:
az sshkey create --name vantage-ssh-key -
Restrict access to the private key. Replace
<path_to_private_key_file>with the private key path returned by the previous command:chmod 600 <path_to_private_key_file> -
Create a Ubuntu VM with 4 CPU’s and 8GB of RAM, a 30GB os disk and a 60GB data disk.
az disk create -n teradata-vantage-express --size-gb 60
az vm create `
  --name teradata-vantage-express `
  --image UbuntuLTS `
  --admin-username azureuser `
  --ssh-key-name vantage-ssh-key `
  --size Standard_F4s_v2 `
  --public-ip-sku Standard

$diskId = (az disk show -n teradata-vantage-express --query 'id' -o tsv) | Out-String
az vm disk attach --vm-name teradata-vantage-express --name $diskId
az disk create -n teradata-vantage-express --size-gb 60 az vm create \ --name teradata-vantage-express \ --image UbuntuLTS \ --admin-username azureuser \ --ssh-key-name vantage-ssh-key \ --size Standard_F4s_v2 \ --public-ip-sku Standard DISK_ID=$(az disk show -n teradata-vantage-express --query 'id' -o tsv) az vm disk attach --vm-name teradata-vantage-express --name $DISK_IDaz disk create -n teradata-vantage-express --size-gb 60 az vm create \ --name teradata-vantage-express \ --image UbuntuLTS \ --admin-username azureuser \ --ssh-key-name vantage-ssh-key \ --size Standard_F4s_v2 \ --public-ip-sku Standard DISK_ID=$(az disk show -n teradata-vantage-express --query 'id' -o tsv) az vm disk attach --vm-name teradata-vantage-express --name $DISK_ID -
ssh to your VM. Replace
<path_to_private_key_file>and<vm_ip>with values that match your environment:ssh -i <path_to_private_key_file> azureuser@<vm_ip> -
Once in the VM, switch to
rootuser:sudo -i -
Prepare the download directory for Vantage Express:
mkdir /opt/downloads cd /opt/downloads -
Mount the data disk:
parted /dev/sdc --script mklabel gpt mkpart xfspart xfs 0% 100% mkfs.xfs /dev/sdc1 partprobe /dev/sdc1 export DISK_UUID=$(blkid | grep sdc1 | cut -d"\"" -f2) echo "UUID=$DISK_UUID /opt/downloads xfs defaults,nofail 1 2" >> /etc/fstab -
Install VirtualBox and 7zip:
apt update && apt-get install p7zip-full p7zip-rar virtualbox -y -
Retrieve the curl command to download Vantage Express.
-
Go to Vantage Expess download page (registration required).
-
Click on the latest download link, e.g. "Vantage Express 17.20". You will see a license agreement popup. Don’t accept the license yet.
-
Open the network view in your browser. For example, in Chrome press F12 and navigate to
Networktab: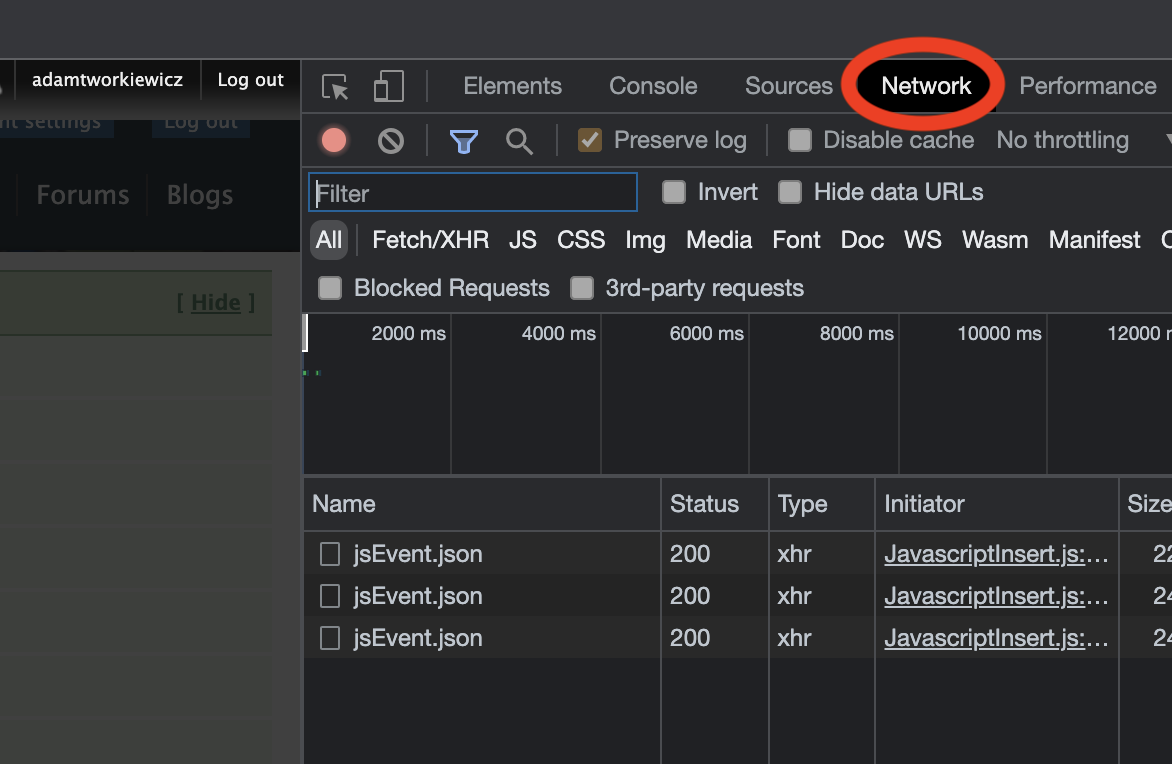
-
Accept the license by clicking on
I Agreebutton and cancel the download. -
In the network view, find the last request that starts with
VantageExpress. Right click on it and selectCopy → Copy as cURL: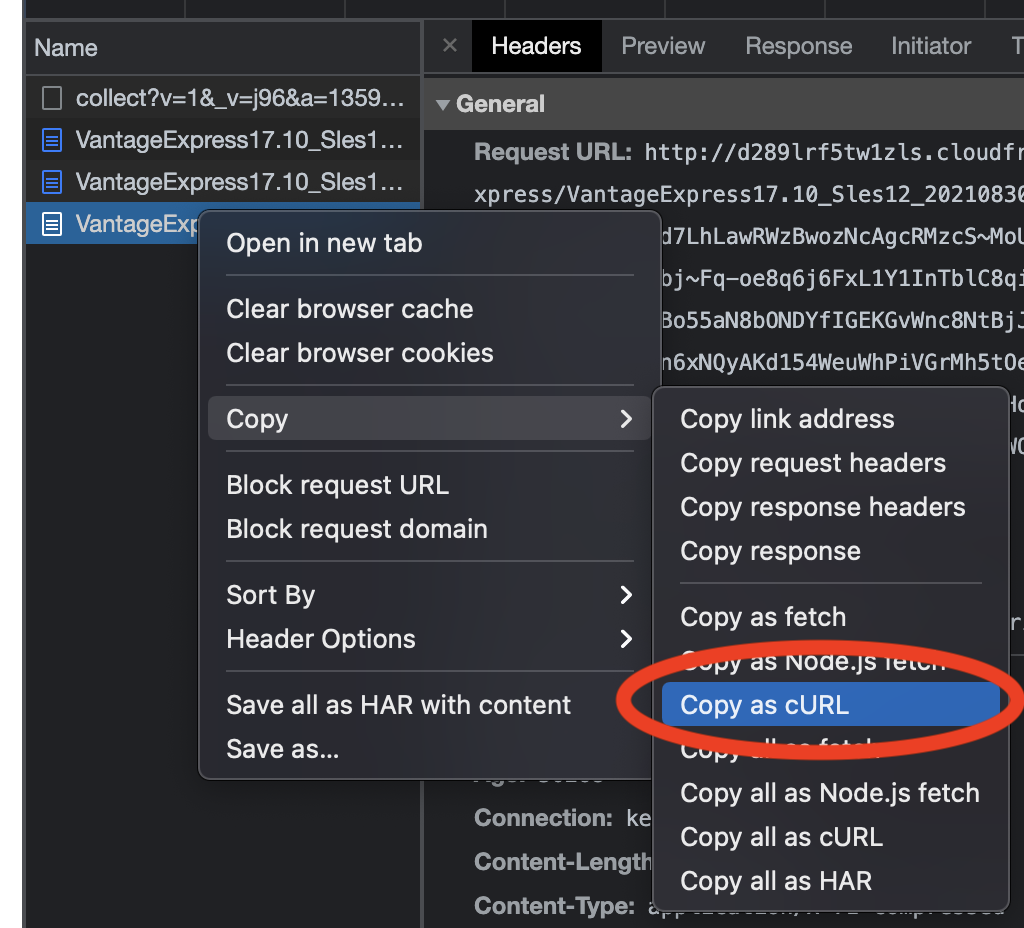
-
-
Head back to the ssh session and download Vantage Express by pasting the curl command. Add
-o ve.7zto the command to save the download to file namedve.7z. You can remove all the HTTP headers, e.g.:curl -o ve.7z 'http://d289lrf5tw1zls.cloudfront.net/database/teradata-express/VantageExpress17.20_Sles12_202108300444.7z?Expires=1638719978&Signature=GKBkNvery_long_signature__&Key-Pair-Id=********************' -
Unzip the downloaded file. It will take several minutes:
7z x ve.7z -
Start the VM in VirtualBox. The command will return immediately but the VM init process will take several minutes:
export VM_IMAGE_DIR="/opt/downloads/VantageExpress17.20_Sles12" DEFAULT_VM_NAME="vantage-express" VM_NAME="${VM_NAME:-$DEFAULT_VM_NAME}" vboxmanage createvm --name "$VM_NAME" --register --ostype openSUSE_64 vboxmanage modifyvm "$VM_NAME" --ioapic on --memory 6000 --vram 128 --nic1 nat --cpus 4 vboxmanage storagectl "$VM_NAME" --name "SATA Controller" --add sata --controller IntelAhci vboxmanage storageattach "$VM_NAME" --storagectl "SATA Controller" --port 0 --device 0 --type hdd --medium "$(find $VM_IMAGE_DIR -name '*disk1*')" vboxmanage storageattach "$VM_NAME" --storagectl "SATA Controller" --port 1 --device 0 --type hdd --medium "$(find $VM_IMAGE_DIR -name '*disk2*')" vboxmanage storageattach "$VM_NAME" --storagectl "SATA Controller" --port 2 --device 0 --type hdd --medium "$(find $VM_IMAGE_DIR -name '*disk3*')" vboxmanage modifyvm "$VM_NAME" --natpf1 "tdssh,tcp,,4422,,22" vboxmanage modifyvm "$VM_NAME" --natpf1 "tddb,tcp,,1025,,1025" vboxmanage startvm "$VM_NAME" --type headless vboxmanage controlvm "$VM_NAME" keyboardputscancode 1c 1c -
ssh to Vantage Express VM. Use
rootas password:ssh -p 4422 root@localhost -
Validate that the DB is up:
pdestate -aIf the command returns
PDE state is RUN/STARTED. DBS state is 5: Logons are enabled - The system is quiescent, it means that Vantage Express has started. If the status is different, repeatpdestate -atill you get the correct status. -
Once Vantage Express is up and running, start
bteqclient command line client. BTEQ (pronounced “bee-teek”) is a general-purpose, command-based client tool used to submit SQL queries to a Teradata Database.bteq -
Once in bteq, connect to your Vantage Express instance. When asked for the password, enter
dbc:.logon localhost/dbc
Run sample queries
-
Using
dbcuser, we will create a new database calledHR. Copy/paste this query and run press Enter:CREATE DATABASE HR AS PERMANENT = 60e6, -- 60MB SPOOL = 120e6; -- 120MB -
Let’s create a sample table and insert some data and query it. We will first create a table to hold employee information:
CREATE SET TABLE HR.Employees ( GlobalID INTEGER, FirstName VARCHAR(30), LastName VARCHAR(30), DateOfBirth DATE FORMAT 'YYYY-MM-DD', JoinedDate DATE FORMAT 'YYYY-MM-DD', DepartmentCode BYTEINT ) UNIQUE PRIMARY INDEX ( GlobalID ); -
Now, let’s insert a record:
INSERT INTO HR.Employees ( GlobalID, FirstName, LastName, DateOfBirth, JoinedDate, DepartmentCode ) VALUES ( 101, 'Adam', 'Tworkowski', '1980-01-05', '2004-08-01', 01 ); -
Finally, let’s see if we can retrieve the data:
SELECT * FROM HR.Employees;You should get the following results:
GlobalID  FirstName  LastName   DateOfBirth  JoinedDate  DepartmentCode
--------  ---------  ---------- -----------  ----------  --------------
     101  Adam       Tworkowski  1980-01-05  2004-08-01               1
Optional setup
-
If you intend to stop and start the VM, you may want to add Vantage Express to autostart. ssh to your VM and run the following commands:
sudo -i cat <<EOF >> /etc/default/virtualbox VBOXAUTOSTART_DB=/etc/vbox VBOXAUTOSTART_CONFIG=/etc/vbox/autostart.cfg EOF cat <<EOF > /etc/systemd/system/vantage-express.service [Unit] Description=vm1 After=network.target virtualbox.service Before=runlevel2.target shutdown.target [Service] User=root Group=root Type=forking Restart=no TimeoutSec=5min IgnoreSIGPIPE=no KillMode=process GuessMainPID=no RemainAfterExit=yes ExecStart=/usr/bin/VBoxManage startvm vantage-express --type headless ExecStop=/usr/bin/VBoxManage controlvm vantage-express savestate [Install] WantedBy=multi-user.target EOF systemctl daemon-reload systemctl enable vantage-express systemctl start vantage-express -
If you would like to connect to Vantage Express from the Internet, you will need to open up firewall holes to your VM. You should also change the default password to
dbcuser:-
To change the password for
dbcuser go to your VM and start bteq:bteq -
Login to your database using
dbcas username and password:.logon localhost/dbc -
Change the password for
dbcuser:MODIFY USER dbc AS PASSWORD = new_password; -
You can now open up port 1025 to the internet using gcloud command:
az vm open-port --name teradata-vantage-express --port 1025
-
Cleanup
To stop incurring charges, delete all the resources associated with the resource group:
az group delete --no-wait -n tdve-resource-groupFurther reading
| If you have any questions or need further assistance, please visit our community forum where you can get support and interact with other community members. |