ModelOps - Import and Deploy your first GIT Model
Author: Pablo Escobar de la Oliva
Last updated: May 29th, 2022
Overview
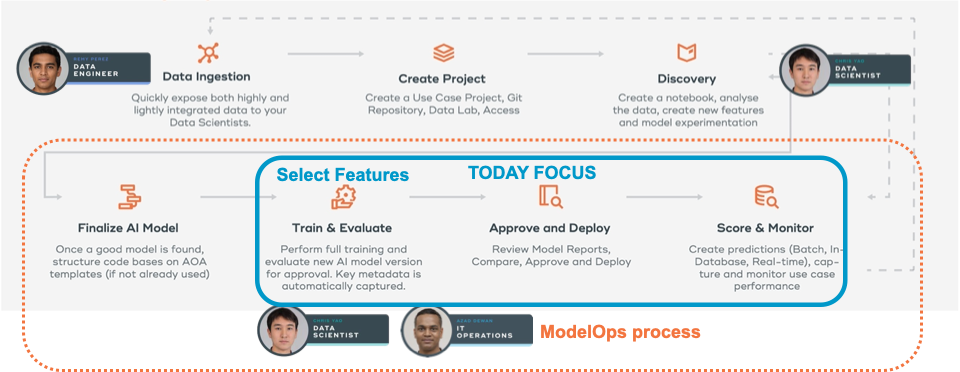
This is a how-to for people who are new to ClearScape Analytics ModelOps. In the tutorial, you will be able to create a new project in ModelOps, upload the required data to Vantage, and track the full lifecycle of a demo model using code templates and following the methodology for GIT models in ModelOps.
Prerequisites
-
Access to a Teradata Vantage instance with ClearScape Analytics (includes ModelOps)
-
Ability to run Jupyter notebooks
| If you need a test instance of Vantage, you can provision one for free at https://clearscape.teradata.com. |
Files needed
Let’s start by downloading the needed files for this tutorial. Download these 4 attachments and upload them in your Notebook filesystem. Select the files depending on your version of ModelOps:
ModelOps version 6 (October 2022):
Alternatively you can git clone following repos
git clone https://github.com/willfleury/modelops-getting-started
git clone https://github.com/Teradata/modelops-demo-models/
ModelOps version 7 (April 2023):
git clone -b v7 https://github.com/willfleury/modelops-getting-started.git
git clone https://github.com/Teradata/modelops-demo-models/
Setting up the database and Jupyter environment
Follow the ModelOps_Training Jupyter Notebook to setup the database, tables and libraries needed for the demo.
Create a new Project or use an existing one
Add a new Project
-
create project
-
Details
-
Name: Demo: your-name
-
Description: ModelOps Demo
-
Group: your-name
-
Credentials: No Credentials
-
Branch: master
Here you can test the git connection. If is green then save and continue. Skip the service connection settings for now.
When creating a new project, ModelOps will ask you for a new connection.
Create a Personal Connection
Personal connection
-
Name: Vantage personal your-name
-
Description: Vantage demo env
-
Host: tdprd.td.teradata.com (internal for teradata transcend only)
-
Database: your-db
-
VAL Database: TRNG_XSP (internal for teradata transcend only)
-
BYOM Database: TRNG_BYOM (internal for teradata transcend only)
-
Login Mech: TDNEGO
-
Username/Password
Validate permissions in SQL database for VAL and BYOM
You can check the permissions with the new healthcheck panel in the connections panel

Add dataset to identify Vantage tables for BYOM evaluation and scoring
Let’s create a new dataset template, then 1 dataset for training and 2 datasets for evaluation so we can monitor model quality metrics with 2 different datasets
Add datasets
-
create dataset template
-
Catalog
-
Name: PIMA
-
Description: PIMA Diabetes
-
Feature Catalog: Vantage
-
Database: your-db
-
Table: aoa_feature_metadata
Features Query:
SELECT * FROM {your-db}.pima_patient_featuresEntity Key: PatientId Features: NumTimesPrg, PlGlcConc, BloodP, SkinThick, TwoHourSerIns, BMI, DiPedFunc, Age
Entity & Target Query:
SELECT * FROM {your-db}.pima_patient_diagnosesEntity Key: PatientId Target: HasDiabetes
Predictions
-
Database: your-db
-
Table: pima_patient_predictions
Entity selection:
Query:
SELECT * FROM pima_patient_features WHERE patientid MOD 5 = 0Only for v6 (in v7 you will define this in the BYOM no code screen): BYOM Target Column: CAST(CAST(json_report AS JSON).JSONExtractValue('$.predicted_HasDiabetes') AS INT)
Create training dataset
Basic
-
Name: Train
-
Description: Training dataset
-
Scope: Training
-
Entity & Target
Query:
SELECT * FROM {your-db}.pima_patient_diagnoses WHERE patientid MOD 5 = 1Create evaluation dataset 1
Basic
-
Name: Evaluate
-
Description: Evaluation dataset
-
Scope: Evaluation
-
Entity & Target
Query:
SELECT * FROM {your-db}.pima_patient_diagnoses WHERE patientid MOD 5 = 2Create evaluation dataset 2
Basic
-
Name: Evaluate
-
Description: Evaluation dataset
-
Scope: Evaluation
-
Entity & Target
Query:
SELECT * FROM {your-db}.pima_patient_diagnoses WHERE patientid MOD 5 = 3Prepare code templates
For Git Models we need to fill the code templates available when adding a new model.
These code scripts will be stored in the git repository under: model_definitions/your-model/model_modules/
-
init.py : this an empty file required for python modules
-
training.py: this script contains train function
def train(context: ModelContext, **kwargs):
    aoa_create_context()

    # your training code

    # save your model
    joblib.dump(model, f"{context.artifact_output_path}/model.joblib")

    record_training_stats(...)
Review the Operationalize notebook to see how you can execute this from CLI or from notebook as an alternative to ModelOps UI.
-
evaluation.py: this script contains evaluate function
def evaluate(context: ModelContext, **kwargs):
    aoa_create_context()

    # read your model
    model = joblib.load(f"{context.artifact_input_path}/model.joblib")

    # your evaluation logic

    record_evaluation_stats(...)
Review the Operationalize notebook to see how you can execute this from CLI or from notebook as an alternative to ModelOps UI.
-
scoring.py: this script contains score function
def score(context: ModelContext, **kwargs):
    aoa_create_context()

    # read your model
    model = joblib.load(f"{context.artifact_input_path}/model.joblib")

    # your evaluation logic

    record_scoring_stats(...)
Review the Operationalize notebook to see how you can execute this from CLI or from notebook as an alternative to ModelOps UI.
-
requirements.txt: this file contains the library names and versions required for your code scripts. Example:
%%writefile ../model_modules/requirements.txt
xgboost==0.90
scikit-learn==0.24.2
shap==0.36.0
matplotlib==3.3.1
teradataml==17.0.0.4
nyoka==4.3.0
aoa==6.0.0-
config.json: this file located in the parent folder (your-model folder) contains default hyper-parameters
%%writefile ../config.json
{
   "hyperParameters": {
      "eta": 0.2,
      "max_depth": 6
   }
}
Go and review the code scripts for the demo model in the repository: https://github.com/Teradata/modelops-demo-models/
Go into model_definitions→python-diabetes→model_modules
Model Lifecycle for a new GIT
-
Open Project to see models available from GIT
-
Train a new model version
-
see how CommitID from code repository is tracked
-
Evaluate
-
Review evaluation report, including dataset statistics and model metrics
-
Compare with other model versions
-
Approve
-
Deploy in Vantage - Engine, Publish, Schedule. Scoring dataset is required Use your connection and select a database. e.g "aoa_byom_models"
-
Deploy in Docker Batch - Engine, Publish, Schedule. Scoring dataset is required Use your connection and select a database. e.g "aoa_byom_models"
-
Deploy in Restful Batch - Engine, Publish, Schedule. Scoring dataset is required Use your connection and select a database. e.g "aoa_byom_models"
-
Deployments/executions
-
Evaluate again with dataset2 - to monitor model metrics behavior
-
Monitor Model Drift - data and metrics
-
Open BYOM notebook to execute the PMML predict from SQL code when deployed in Vantage
-
Test Restful from ModelOps UI or from curl command
-
Retire deployments
Summary
In this quick start we have learned how to follow a full lifecycle of GIT models into ModelOps and how to deploy it into Vantage or into Docker containers for Edge deployments. Then how we can schedule a batch scoring or test restful or on-demand scorings and start monitoring on Data Drift and Model Quality metrics.
Further reading
-
link:https://docs.teradata.com/search/documents?query=ModelOps&sort=last_update&virtual-field=title_only&content-lang=
| If you have any questions or need further assistance, please visit our community forum where you can get support and interact with other community members. |